Networking on the Minimig with PPP and Roadshow

When working with an Amiga running on a Minimig platform then data transfer is not as convenient as one might think: You have an SD Card connected and copying files around with SD Card is not the biggest deal, but unfortunately your Amiga is currently running from a system drive stored on this card :/ Each copy operation therefore essentially requires a reboot of your Amiga and that’s not the productive work flow I had in mind…

That’s the reason why I always prefer having network access on all my machines for truly covenient file handling (e.g. with FTP, wget…).

In my last post I showed you how to add a SilverSurfer high speed serial port to your Minimig running on the Turbo Chameleon 64. Now we will use this serial port that is running up to 115200 Baud with ease for something useful: networking! Old farts remember the times when home network access was done with PPP and a serial modem gateway. We’ll go that road but replace the modem and gateway with a small and cheap Linux machine, here the all hyped Rpi and a direct serial “null modem” link via an USB-to-serial adapter.

TC64 with SilverSurfer attached to Raspi

TC64 with SilverSurfer attached to Raspi

Read on to find out all the glory details, starting with a pure “virtual” simulation running on a Mac on to the real thing…

[You can use this approach to bring other classic Amigas to the network, too. But for all machines with a parallel port available I’d suggest to use my plipbox project: Its far easier to setup, a lot faster (4-5x ), and even cheaper :)]

Continue reading

A clockport for Chameleon64’s Minimig

The Chameleon64 is a very powerful and versatile cartridge: Although its initially a C64 cartridge, it also runs standalone and allows to emulate different machines by replacing the FPGA programming. Today I use mine mainly as a HW Amiga emulator with the brilliant Minimig FPGA implementation.

If you look at the HW of the Chameleon you’ll see the clockport connector on the lower right. While this connection was initially devised for the Amigas to add a Real Time Clock (hence the name), it soon became a versatile 8 Bit interface for lots of different HW extensions. It was even “ported” back to the C64 to use some of the Amiga extension cards there as well… That’s the reason why you find it on your Chameleon…

Hmm, I thought… now with an Amiga running on the cartridge why not close the circle and make the clockport accessible to the Minimig, too?

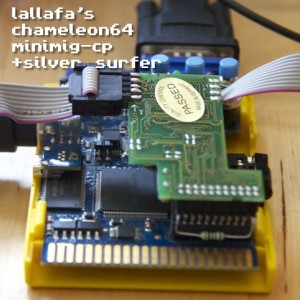
A new project was born: TC64 Minimig-cp (cp for clockport!):

tc-cpRead on if you want to know how this was done and if you want to try it out yourself, e.g. use your SilverSurfer serial card on your Minimig Amiga 🙂

Continue reading

Adding touch support for the MI0283QT* displays

In my last posts I showed how to integrate Watterott’s MI0283QT-2 and the newer -9 displays as a frame buffer device in Raspberry Pi’s Linux kernel. Now I will focus on adding support for the touch controller found on the display boards.

The touch controller is an ADS7846 chip that already has a device driver in the Linux kernel. User dronus has patched the vanilla driver to make it work with the MI0283QT displays and the Raspberry Pi.

Fine, we already have everything in place now to give it a try!

Hardware

First, we need to add two additional wires in our hardware setup to connect the touch controller (see old wiring in last post) with the RPi:

Signal     Raspi      Display   Comment
T_IRQ      GPIO25       13       Interrupt line from ADS7846
T_CS       SPI0_CE0_N   11       SPI chip select 0

Software

I assume you already have a patched Linux kernel with the tft driver patches applied. Here is quick list with the next steps:

  • (Manually) apply dronus small patch to your kernel tree. This adds the necessary modifications of the ADS driver.
  • Note: I had to replace the invert_x with the invert_y entry in the ADS configuration to match the display orientation we use in the frame buffer driver
  • Your SPI config for the display now should look like this (for the newer *-9 display): linux/file arch/arm/mach-bcm2708/bcm2708.c
static struct ads7846_platform_data ads7846_config = {
  .x_max      = 0x0fff,
  .y_max      = 0x0fff,
  .x_plate_ohms    = 180,
  .pressure_max    = 255,
  .debounce_max    = 10,
  .debounce_tol    = 3,
  .debounce_rep    = 1,
  .gpio_pendown    = 25,
  .keep_vref_on    = 1,
  .swap_xy     = true,
  .invert_y    = true
};

static struct spi_board_info bcm2708_spi_devices[] = {
        {
                // ads7846 touchscreen on chipsel=0 device
                .modalias    = "ads7846",
                .bus_num    = 0,
                .chip_select    = 0,
                .max_speed_hz           = 500000,
                .irq      = GPIO_IRQ_START+25,
                .platform_data    = &ads7846_config,
                .mode = SPI_MODE_0
        }, {
                // display on chipsel=1 device
                .modalias = "ili9341fb",
                .max_speed_hz = 16000000,
                .bus_num = 0,
                .chip_select = 1,
                .mode = SPI_MODE_0,
                .platform_data = &(struct fbtft_platform_data) {
                        .gpios = (const struct fbtft_gpio []) {
                                { "reset", 23 },
                                { "led", 24 },
                                {},
                        },
                        .fps = 10
                }
        }
};
  • I use GPIO 25 for the touch IRQ (mainly because wiring was easier this way 🙂 and had to change the relevant entries. dronus used GPIO 17 instead.
  • I reduced the SPI rate of the display to 16 MHz and the frame rate to 10 fps. This proved to be more stable with activated touch controller.
  • The older -2 display works similarly. You only have to exchange the second block with the one of the r61505u driver. See old post for details
  • Open the configuration of the kernel and select the ADS driver:
> make menuconfig
Select "Device Drivers -> Input Device Support -> [*] Touchscreens -> [*] ADS7846..."
  • Make sure to include the ADS driver directly into the kernel and NOT in a module
  • Ok, thats it! (Re-)compile kernel and install it on your RPi…

Test

After a reboot your system shows a new input device in /dev/input/*. If no other USB mouse or keyboard is connected then the devices found there are all created by the touch controller.

You can use the evtest utility to check the touch operation (Install with ‘apt-get install evtest’ first!):

> evtest /dev/input/event0

When you tap on the display you will see the incoming events. Note the x and y coordinates mapping if you tap on different corners of the display.

Now with the basic operation tested you can start X11 on your display (see last post) and use your fingers or a stylus to navigate the mouse cursor!

Open Topic

While touch operation with this driver is rock solid and works very precisely I have found one little nuisance: I can’t move the X11 cursor into the border regions of the display 🙁 Approx 5 mm at the border of the visibile display area my touch movements are not recognized anymore and I can’t move the pointer there… I am not sure if this is a limitation of the display, of the ADS driver or the parameter set for the driver… If you find a workaround for this then please post a comment!

[Update: 21.4.2013] Pre-compiled Kernel

A pre-compiled Raspbian Wheezy Kernel 3.6.11+ with both ili9341 display and ads7846 touch driver (i.e. supporting all devices on the MI0283QT-9 board) is available for download here:

pifon: an audio baby monitor for two Raspberry Pis

Becoming a dad does not only completely change your life but also changes the scope of your hobby projects (If time still permits :)) My first self-made project made especially for my newborn baby boy Felix is called pifon and is an audio baby monitor realized with two Raspberry Pi devices.

the pifon project: two Raspberry Pis converted into an audio baby monitor

Hardware

The hardware setup is fairly simple: one Pi, the pifon server, has a USB web cam attached. I use its internal microphone to record the voice of my little boy. The other Pi is the pifon monitor and has a set of analog speakers attached for the output. Additionaly, the mon device has an Adafruit RGB LCD Plate attached and I use the LCD on this little plate as output device and its 5 keys as user input. I did not mount the plate directly on the Pi but used a ribbon cable to detach it: This allows me to package the plate in its own housing (As it is easier to find a case for the plate alone):

pifon/mon: the listening Pi with the control panel attached

Continue reading

Watterott Display on Raspberry Pi

I really like my Raspberry Pi, but what I am missing is a tiny display matching the size of the board that can be used as primary display, the boot console or some graphics later on.

A very nice and cheap TFT display is the MI0283QT-Adapter (note: I got the -2 version not the newer -9 version that has another display driver chip!) sold by Watterott. Its mainly focused to be an add on for the Arduinos, but it should work on every embedded system providing SPI access.

For the Linux running on the Raspberry Pi a framebuffer driver for the display would be the best solution, as it allows you to use it as a boot console and then you can run everything that runs on a framebuffer device (e.g. X11, SDL, mplayer, …).

First I thought about writing a fresh driver from scratch but some google-fu showed me that there already exists a nice solution: user notro has written fbtft, a driver framework that allows to simplify writing an own driver for those tiny TFTs.

For the R61505u display chip found on my display board, there was no driver available, but thanks to notro’s powerful framework and Watterott’s example code (Thanks to Markus for porting the code to the Raspi), I was able to derive a new driver for this chip in a few hours: See my cloned fbtft Git Hub repository for the source.

It works really nice: with 32 MHz SPI clock I can run 25 frames per second and even watch movies with smooth display:

Playing Big Bug Bunny with MPlayer's fbdev output

If you compile the driver directly in your kernel (i.e. no modules) then you can use the display directly as the boot console of your board:

Linux Boot Console running on display

If you want to build this setup yourself then read on…

Continue reading

Build an Arduino-based Temperature Logger

Ok, this time its no retro project, but a rather useful tool to measure your temperatue at home over a longer period of time. I had trouble with my heating devices at home and so I wanted to record and present temperature curves of various rooms to show that something is wrong…

This was a friday night project and done in a few hours (some might call it a hardware hack – but it works fairly stable for weeks now!). All you need is an Arduino 2009 Board, a Logger Shield, a push button, 2 1k resistors, and a DS18S20 temperature sensor. With these ingredients I was able to build the following compact temperature logger:

Arduino and Logger Shield: Temperature Logger

The logger samples the temperature every 10s and gives you a digital temperature value with +/-0.5 degree Celsius precision. It has a RTC (real-time-clock) on board that time stamps every measurement. Addionally, the SD card allows you to store the temperature samples in log files.

The logger has two modes of operation: Either directly read the temperature via a Mac/PC connected via the virtual serial port available on USB or write a temperature log onto the SD card. The latter mode allows you to use the device stand alone in any room without the need to directly connect your computer.

Read on for the full build and usage instructions…

Continue reading

SilverSurfer patched for Amiga 500

I just purchased a new HW goodie for my classic Amiga 500. A clockport adapter and a SilverSurfer serial card that allows high baudrates (e.g. 115200 baud) on this machine without generating too much CPU load.

HW installation was fairly easy, but with the software the trouble began… The supplied drivers does not run on an Amiga 500 but only on an A1200 🙁 Being a real retro hacker I had a look at the driver binary, disassembled it and found out that the code could be easily patched to run on an A500, too.

Now it works like a charm even on the 680000 machines. Here try yourself: silversurfer104-a500.zip

If you want to know how this was done… then read on… Be warned: technical details ahead 😉

Continue reading

What I’ve done lately…

So many month passed by and no update here… I wasn’t lazy (at least not all the time 😉 and so I’ll give you a short summary what retro projects I’ve been involved with lately:

  • DiskFreeezerX – My pet project that aims to build a standalone disk capture device… Should come very handy for partys or meeting people that don’t want to leave their precious disks… Take the device with you, slip in a disk, press a button and some time later you have a shiny exact clone of the disk on your SD card… That’s the goal!
    The current state here is: The device is built and functional as a prototype and as a first Rev A PCB… See my shiny new dfx hardware page for all the glory details and lots of photos…
  • MacVICE – Not much own contribs done here lately. But always following the flow of new features and busy building current snapshots. And before I forget it: With MagerValp’s help I finally fixed the dreaded “black-screen” display problem when the fine blended display is enabled… So enjoy temporal filtering with no more black outs!
  • PUAE – I am really happy that GnoStiC is now bringing together the current WinUAE and the already dated E-UAE code base to create finally a greate Amiga emualator for all *nix, Linux and Mac users… I really appreciate that and help by submitting small patches. I’ve created my own little fork/clone of the repository at GitHub: You can check this out if you want to have a look what I am patching lately: PUAE/cnvogelg
  • amitools – Another little crazy project started by me. Its a python library that allows you to read and parse Amiga’s Hunk-based binary format. With all the memory on the good ol’ times fading away and with UAE refreshing my old desire for the Amiga I wrote this lib to refresh and to store the old knowledge in readable python code. Currently, there is not much docs there. But a real hacker will find his/her way… I wrote a small sample that scans your harddrive for amiga files (even in adf, lha containers) and tries to parse the exe with the lib… The lib got a new push with the introduction of the AROS m68k Port (yay!!).. This port uses a decent gcc compiler to generate m68k-elf binaries. So I added ELF parsing to amitools. The only thing still missing is now the converter elf to hunk and back again in python (similar to elf2hunk)…

That’s it! See you soon with more updates…

DiskFreezerX going public

Hi all,

its now quite a while that I released something… But I wasn’t lazy in that time. I got amazed by the possibilities of bit cell exact disk capture as presented by the Cyclone20 and KryoFlux… and so I wanted to build my own disk capture unit.

I recently bought a BeagleBoard clone board called IGEPv2 and soon the idea emerged to build a stand-alone disk copy unit based on this board. In the end I’d like to have a box with a floppy drive and a beagle with sd card slot. I can insert a disk to capture and then press a single button to create a bit cell exact and bit rot resistent disk image version on the SD card…

I started experimenting with the AT91SAM7x CPU used as a sampler device in the Cylcone20 and KryoFlux projects. Since no public firmware exists I wrote my own version from scratch. I don’t use USB for data transfer but an SPI channel between SAM7x and the Beagle. The beagleboard runs Poky/Angstrom Linux and therefore the host capture tool is written in C using spidev in user space. All processing tools working on the sampled bit cells are written as Python scripts.

Now everything works really well, i.e. I can capture a disk trackwise and store the samples reliably. Furthermore the conversion tools now can extract a bit stream, decode AmigaDOS blocks and derive an ADF Disk Image in the end. Its by far not a finished project but its in a state you can already work and experiment with…

If you got interested then head over to my DiskFreezerX project page